You might want to copy a video file from a DVD to your Mac for various reasons. After all, DVDs may not last too long, and it is wise to copy their contents on your computer. You might need some help if you have not tried it before. But, the task is quite simple once you know how to proceed with it.
Here, we will look at how to transfer video from DVD to Mac. Depending on the situation, you may or may not need to download an application for this task. So, the procedure might not be the same for everyone.
Transferring the Video from an Unprotected DVD
Do you want to copy a video file from an unprotected DVD to your Mac? Then, you can do that without using an application. The features available on your macOS are all you would need for this task.
Proceed with the following steps to transfer video from DVD to Mac in such situations:
Insert the DVD in Your Mac’s Drive
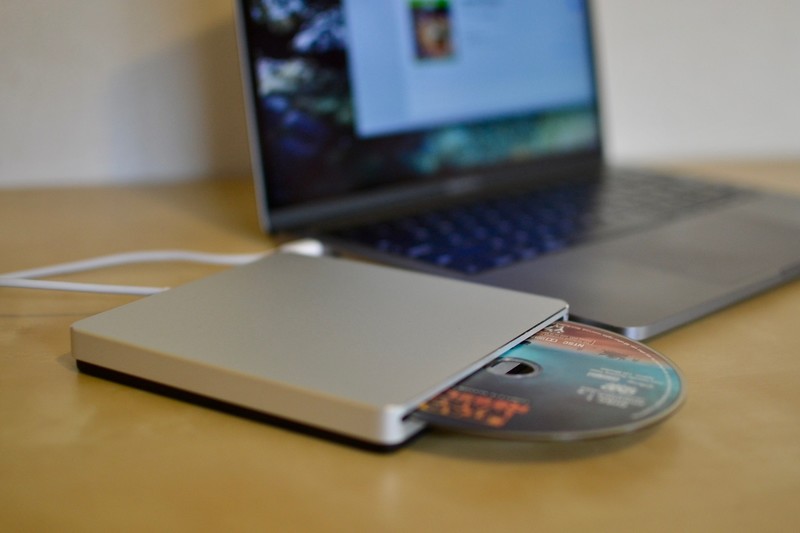
You must insert the DVD in the drive first to copy it. However, some Mac devices might lack a built-in CD drive. In such cases, you must use an external CD drive. You will find many suitable options in the market if you are not already using one.
Make sure to insert the disc properly into the drive. Otherwise, your device would fail to read it. Does your Mac fail to detect the disc even when you have inserted it properly? Then, there is a hardware issue with your device, and you must contact a technician.
Find the DVD in the Disk Utility
Navigate to the Disk Utility feature on your Mac using the search bar on your system. Then, check the names of the drives given on the left panel and select your DVD.
In case you cannot find it, make sure your device can detect the disc. Check the names under the External section to find your DVD. Click on it to view its storage details and proceed with the next step.
Create a New Image
Go to the File tab of your DVD in the Disk Utility window. Then, click on ‘New Image’ and select ‘Image from (your DVD’s name)’. This will initiate the creation of a copy of the disc’s contents.
Then, you must proceed with the following steps to complete the transfer video from DVD to Mac procedure:
Enter a New Name for the Video
First, you need to set a name for the video file in the field next to ‘Save As’. So, type a name you want to use, and then select a suitable location.
Select a Location for the File
You would find a selection next to the ‘Where’ option. Click on it if you prefer to transfer the video to another location. Select a suitable drive and folder on your Mac’s drive to save the file. You can also save it on your desktop to make finding the file easier.
Set the Format and Encryption
You can also select a suitable format for the video, if you prefer to do so. Not only that, but you can also encrypt it to enhance its security. You can also leave the video file without any encryption if you prefer.
In case you are wondering, it is possible to encrypt the file later on. You can also simply copy it to cloud storage to keep it safe.
Save the File
Click on Save at the bottom of the window once you are done with the configuration. You might want to go through the selections at least once before doing that. Also, make sure you can open the file after you transfer it to your Mac.
Transfer a Video from a Protected DVD
Do you want to transfer video from DVD to Mac while the file is protected? Then, you need to install some applications on your device. So, the process differs a bit from that in the case of an unprotected DVD.
Yet, it is quite simple, and you can accomplish it in the following steps:
Download and Install Handbrake
There are many suitable apps for transferring files from a DVD to your Mac. And, Handbrake is among the most reliable ones of them.
Go to the app’s official website to download the installation file for it. Then, open the file on your Mac to start the installation procedure.
Insert the DVD and Open Handbrake
Insert the disc in your Mac’s built-in or external drive for copying its contents. Then, open the handbrake app you have installed to configure the transfer.
Select the DVD there to view its details and proceed with transferring the video file. Complete the procedure with the following simple steps:
Select the Title
Select the field next to ‘Title’, and select the video file’s name. Also, make sure that you have chosen the right file for transferring to your Mac. Then, proceed with the next step of the configuration.
Select a Preset
Click on ‘Toggle Presets’ at the top-right corner and select a suitable option. Also, you must keep in mind that using larger presets does not improve the video quality. It will only increase the file size.
Select a Save Location
Click on Browse and select a location you prefer on your Mac device. You can save it in any folder on your computer, including the Desktop folder. Then, you can proceed with copying the file right away.
Start the Copying
Click on the ‘Start’ button to transfer video from DVD to Mac. Also, you might want to go through the configuration before that. Proceed with the copying once you are ready and try playing the video on your device.
Get an Efficient Repair For MacBook Issues
You would not face any issues while copying a video to your Mac from DVD. But, if you fail to copy the file repeatedly, there might be an issue with your device. MacBook Repair India can diagnose the problem and offer you a long-term solution for it in such cases.