Editing a photo or resizing it using a MacBook is no longer challenging. You can use inbuilt applications to learn how to crop image in MacBook. If you are a MacBook beginner, cropping an image might be confusing.
You might be out of clues about which application you can use. Many amateur MacBook users have reached out to third-party apps to crop and resize images and save or print them according to standard dimensions. However, you can get various integrated macOS applications to edit or crop your images on MacBook.
Let’s get started with how to crop an image on MacBook, shall we?
How to Crop Image in MacBook Air or MacBook Pro?
Preview is the handiest way to deal with cropping an image on any MacBook device. Any Apple computer comes with Preview pre-installed. How to crop image in MacBook using Preview?
Go through the guidelines below to crop or resize a photo, a screenshot, or any image with Preview:
- Open up the Preview application on your Mac computer.
- Choose the image you want to crop using the Finder window.
- After that, click on the Open button from the lower right corner of your Mac screen.
- Click and select the Markup tool from the toolbar of the Preview application.
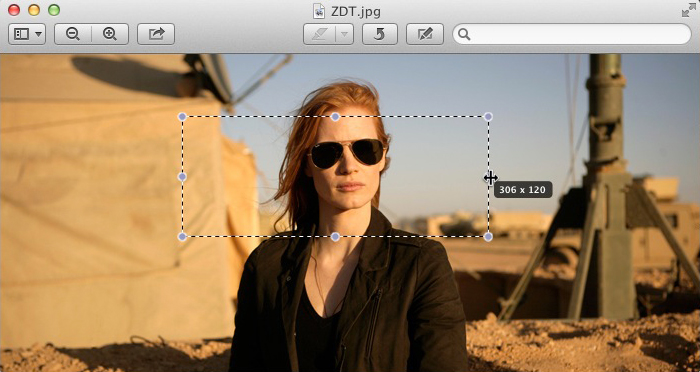
- Click and drag your trackpad pointer or mouse to select the portion you want to crop from the image.
- A cropped portion will pop up to confirm your image area selection. Make sure you crop the required portion of the image because this step is irreversible once you cropped an image.
- Afterwards, click the Crop button once you are satisfied with the selection.
It will automatically save the cropped version of the image. Remember that the original image has been cropped, and you can’t revert the edits for the image when you use Preview.
Crop an Image with a Preview on Mac OS X
If you own an older Apple notebook with Mac OS X, then the technique of how to crop image in MacBooks is a bit different than the previous one. Here’s what you need to follow on Preview if you use Mac OS X:
- Navigate to the picture file that you want to crop using Preview first.
- Next, locate and click an icon resembling a little pencil or toolbox on the Preview app. The icon is known as the Editor Toolbar of the Preview app.
- Afterwards, select the Rectangular Selection icon or any option from the drop-down menu. By default, it’s set to Rectangular Selection.
- Now, use the mouse or trackpad pointer to draw the right or rectangular shape to crop or resize the intended picture accordingly.
- You can use the keyboard shortcut of Command + K to continue cropping the image. Otherwise, you can head towards the Tools menu and select the Crop option to proceed with the resizing.
- It should have cropped the image so far. Save the cropped image on your MacBook by clicking the following option: File → Save or Save As.
So, that’s how to crop image in Mac Preview.
Utilising Keyboard Shortcuts on Preview
Another quick way on – how to crop images on MacBook is to deploy keyboard shortcuts while using the same app, Preview. Open a Finder window and use a few keyboard shortcuts to make the cropping process even faster on Preview. Here’s what you need to follow:
- Hover over to the image you want to crop in a Finder window. Press the Command and O keys simultaneously to open up the image on Preview. For this, Preview should be set as your MacBook’s default image viewer application.
- A selector tool will automatically show up. You need to adjust the selector according to your resizing preferences.
- To crop the image, hit Command + K.
- Afterwards, use the keyboard shortcut of Command + S to save the edited picture.
With simple shortcuts, you can easily try this hack to learn how to crop image in MacBook.
How to Crop Images on MacBook with Photos?
Preview might not be useful for every Mac user to crop images. In that case, you can save the intended picture to the Photos library of your Mac computer. Then, carry on with the following steps to crop an image on your MacBook Pro or Air:
- First, open the Photos application on your MacBook.
- Then, choose the image you like to crop under Photos.
- Next, click on the Edit option from the upper right corner of the window.
- Choose the Crop option and drag the edges or corners of the frame to edit the picture size. You can preview the cropped version of the image before settling for the ultimate edit. You can revert the cropping changes just by dragging the frame outward.
- After that, click on the Done option from the window’s top right corner.
This will save the required cropped version of the image on your MacBook. Now, you can share or print the cropped picture.
Cropping Images Using Pages on MacBook
Are you seeking more precision and control while learning to crop in MacBook Air? Then, you can try Pages to add more flexibility to crop a picture on your Macbook. You can use Pages to edit and print a photo with the following aspects maintained:
- Photo cropping
- Photo sizing
- Paper size
- Page-to-paper enlargement or reduction
Check out the following guidelines to resize or crop an image and print it using Pages:
- Go to Pages and create a new document. Navigate to File followed by New under Pages and choose a blank document template. Next, hit the Create option.
- Now, click on File and select Convert to Page Layout. Confirm the option to switch to a page layout.
- Afterwards, click on the Document icon from the top right corner and select your printer from the Printer & Paper Size menu. This step will help you to select the right page size. For example, if you want a standard size, stick to 4 x 6 Borderless for the picture.
- Next, click on Format from the upper right corner of the app.
- Select and drag the picture you want to crop and print on your Mac.
- Keep the image selected and click on the Arrange tab under the Format menu.
- Check the image size and tick the box next to Constrain Proportions.
- Double-click the image to resize or crop it. The crop tool should have arrived below the image.
- Select the Crop icon and drag the handles accordingly.
Moreover…
The Pages app will display the dimensions of the picture as you drag the frame. Once you are satisfied with the cropping, you can click Done. To print the image, go to File and select Print. Check out additional printing settings and confirm the task.
You can consider third-party applications to edit photos and videos besides using Preview, Photos, or Pages. Leading third-party applications offer how to crop image in MacBook easily. You can try them from the App Store if you want more flexibility.
For example, CamerBag Pro, PhotoBulk, etc., are great third-party applications to edit and amp up your saved images o MacBook. You can trim down screenshots, internet images, and more using these applications on your Mac computer.
Some Cropping Tips to Consider
If you are up to cropping images on your MacBook with native applications, here are a few tips to be safe. Chances are that you might lose the original image, get the wrong image sizing, and more in case you miss the following points:
- Copy the original image and save it somewhere else before you start cropping the desired picture. If you have made a mistake, the duplicate image will let you crop it again. Since you can’t reverse the crop in most cases, start by duplicating the original picture.
- Start making changes bit by bit. Increment such small changes gradually rather than cropping the entire picture initially. For instance, clip the border areas away and continue the process if it feels right. You can edit an image until and unless you click the Save button.
- Cropping an image might disturb the balance between pixel density, colour, tint, and more properties. Therefore, try to adjust the image before you crop. Additionally, maintain the gorgeousness of the image even after cropping. Use additional editing tools to keep the image quality intact.
After all, you should only click on Save or Done after you are satisfied with the cropping actions. Finalise the result only after previewing the changes made to the image.
Hire Technicians from Macbook Repair India
Hopefully, the guide helped you to learn how to crop image in MacBook. If you can’t get away with the above-mentioned steps, contact Macbook Repair India experts for emergency assistance.
Additionally, they can recover lost or corrupted data or images if you have faced data loss while cropping images. Call them to book a service as soon as possible and retrieve your data without any delay.