Apple has released the first developer version of macOS Ventura in the line of Mac systems. It comes with a wide range of new features, and the Stage Manager is one such feature. The device can make it simpler for you to manage apps and files. It can help you perform a wide range of tasks on your Mac.
You can use the Stage Manager in various ways depending on your requirements. Learning some MacOS Ventura Stage Manager tricks might prove to be quite useful for you. Especially so, because it is a new feature and you might need some help learning them.
You can start with the simple ones that are given below.
4 Simple Stage Manager Tricks on MacOS
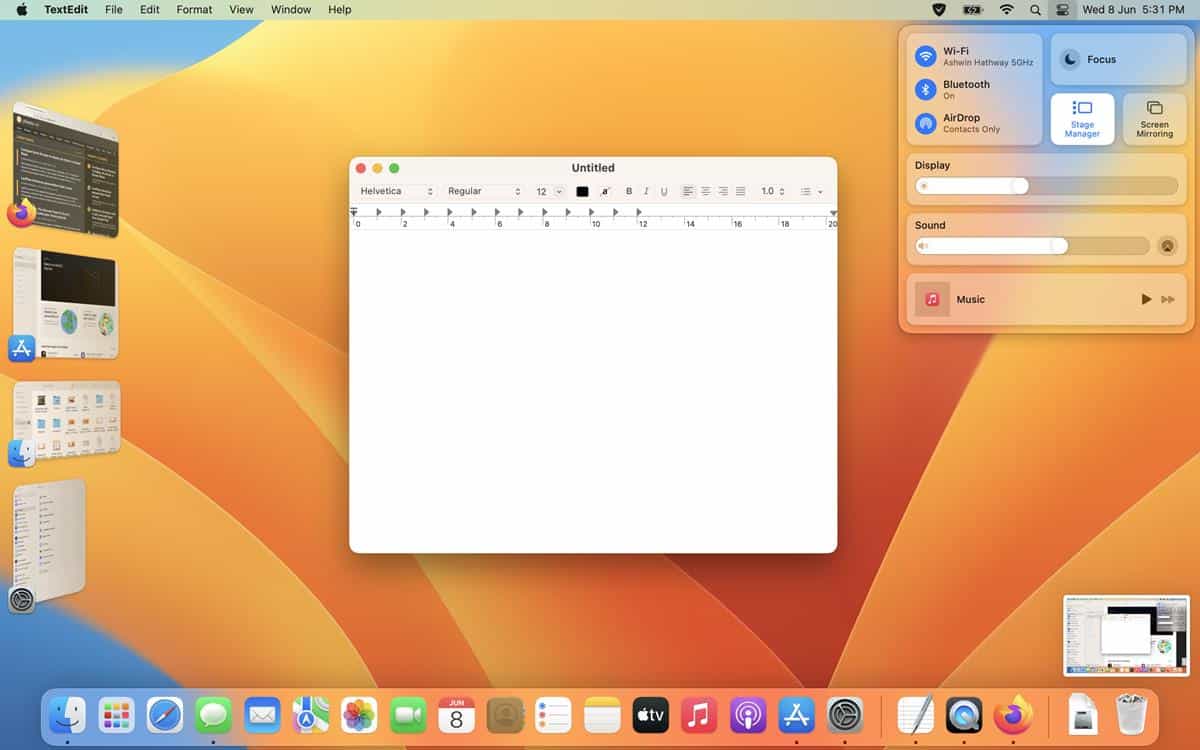
The Stage Manager has more functionalities than it might seem. You can enable or disable this feature on your Mac as per preference. When enabled, it lets you view the running apps on the left side of your screen. These apps appear as thumbnails with the apps’ icon overlapping the bottom-left corner of each thumbnail. You can group apps together, hide recent apps, and show desktop files using the Stage Manager.
Grouping Two or More Apps Together
Two or more of the apps on your device might be of the same category. In such cases, you can group them together on the Stage Manager on the left. You must open the apps that you want to group together to proceed with this trick. The first one that you open would appear on the Stage Manager. However, the second one would show up separately from the first one.
How do you make the second app join the first one on the Stage Manager? To do that, you must drag the thumbnail of the first one towards the app on your desktop. This will group both the apps together, and you can add more apps.
Do you want to add a third app as well? Then, launch it on your screen first and drag the group you had created.
Create Space for More Apps
The Stage Manager can usually show you five apps, but you can add more. However, you must consider your Mac’s screen size while doing that. Smaller screens might not show five apps in the Stage Manager. The simplest way to add an app to the Stage Manager is through the settings.
Navigate to the Desktop & Dock section to do that and enable the ‘Automatically hide and show dock’ option. Doing this will remove the dock to make more space for the Stage Manager. You can then open another app to add it to the Stage Manager.
Are you unwilling to hide the dock from your desktop? You can change its position to make space for an app in the Task Manager. So, try moving it from the bottom left to the bottom right or anywhere else. Resizing the dock might also create enough space to add an app to the Stage Manager.
Change the Dock’s Location
You can change the location of the dock easily by dragging it. Click on it and hold it while moving it towards the new location. Alternatively, you can also change the location through System Preferences.
Navigate to the Dock section there and check the option ‘Position on screen’. You will have to choose between the Left, Right and Bottom next to it. The change would occur as soon as you select a new location.
Resizing the Dock and its Icons
Relocating the dock may not be an option but resizing it is possible in most cases. Does it have a size larger than the minimum one? If yes, open the System Preferences and go to the Dock section. You will find the Size option and set it to the minimum possible size. This will create the largest space possible, in this case, for a new Stage Manager app.
View Desktop Files while Using Stage Manager
When you are using an app with the Stage Manager enabled, that hides the desktop files. So, how do you view the desktop files again in such situations? If you need to view them, you must remove the one that is open on your screen. The program or file you are using does not occupy all of the screens. You must click on the desktop area to view the files there.
Doing this will add the file or app on your screen to the Stage Manager. So, you would have to open it again from the Stage Manager to continue using it. Repeat the aforementioned steps again whenever you need to see the desktop files.
Hide the Recent Apps
The Stage Manager shows all recent apps you have used on your device. Many users do not want other people to view their recently used apps. Hiding recent apps is one of the most important macOS Ventura Stage Manager tricks you must know.
However, you need not worry as you can hide the recent apps from the Stage Manager. Open the Control Centre on your Mac and click on Stage Manager to view its options.
You will get the option to hide or show recent apps after taking the steps given above. In this case, you must opt for hiding them, and you can change this setting anytime. Only you can see that you have hidden all recent apps. Hovering the cursor on the left side of the screen will reveal the recent apps.
How to Disable the Stage Manager?
The Stage Manager takes up a significant amount of space on your screen. So, many users might want to disable this feature for that and some other reasons.
Are you thinking of doing the same? All you need to do is open the Stage Manager section of your Control Centre. Then, toggle off the switch next to ‘Stage Manager’ to disable this feature on your Mac.
Get a MacBook Repair to Fix Any Issues
Your MacBook should be in good condition if you want to try out any tricks on it. In case of any issues, you must get an immediate repair. MacBook Repair India offers you a doorstep repair service for all the latest models. Moreover, the services are quite transparent and come at an affordable price.


